
How To Set Up Appointment Booking
Introduction
In this guide, we will talk you through how to sync your calendar with our Forever Booked app and set up Appointment Booking. To get started right away, skip to the “Pre-requisites” step below.
What is Appointment Booking?
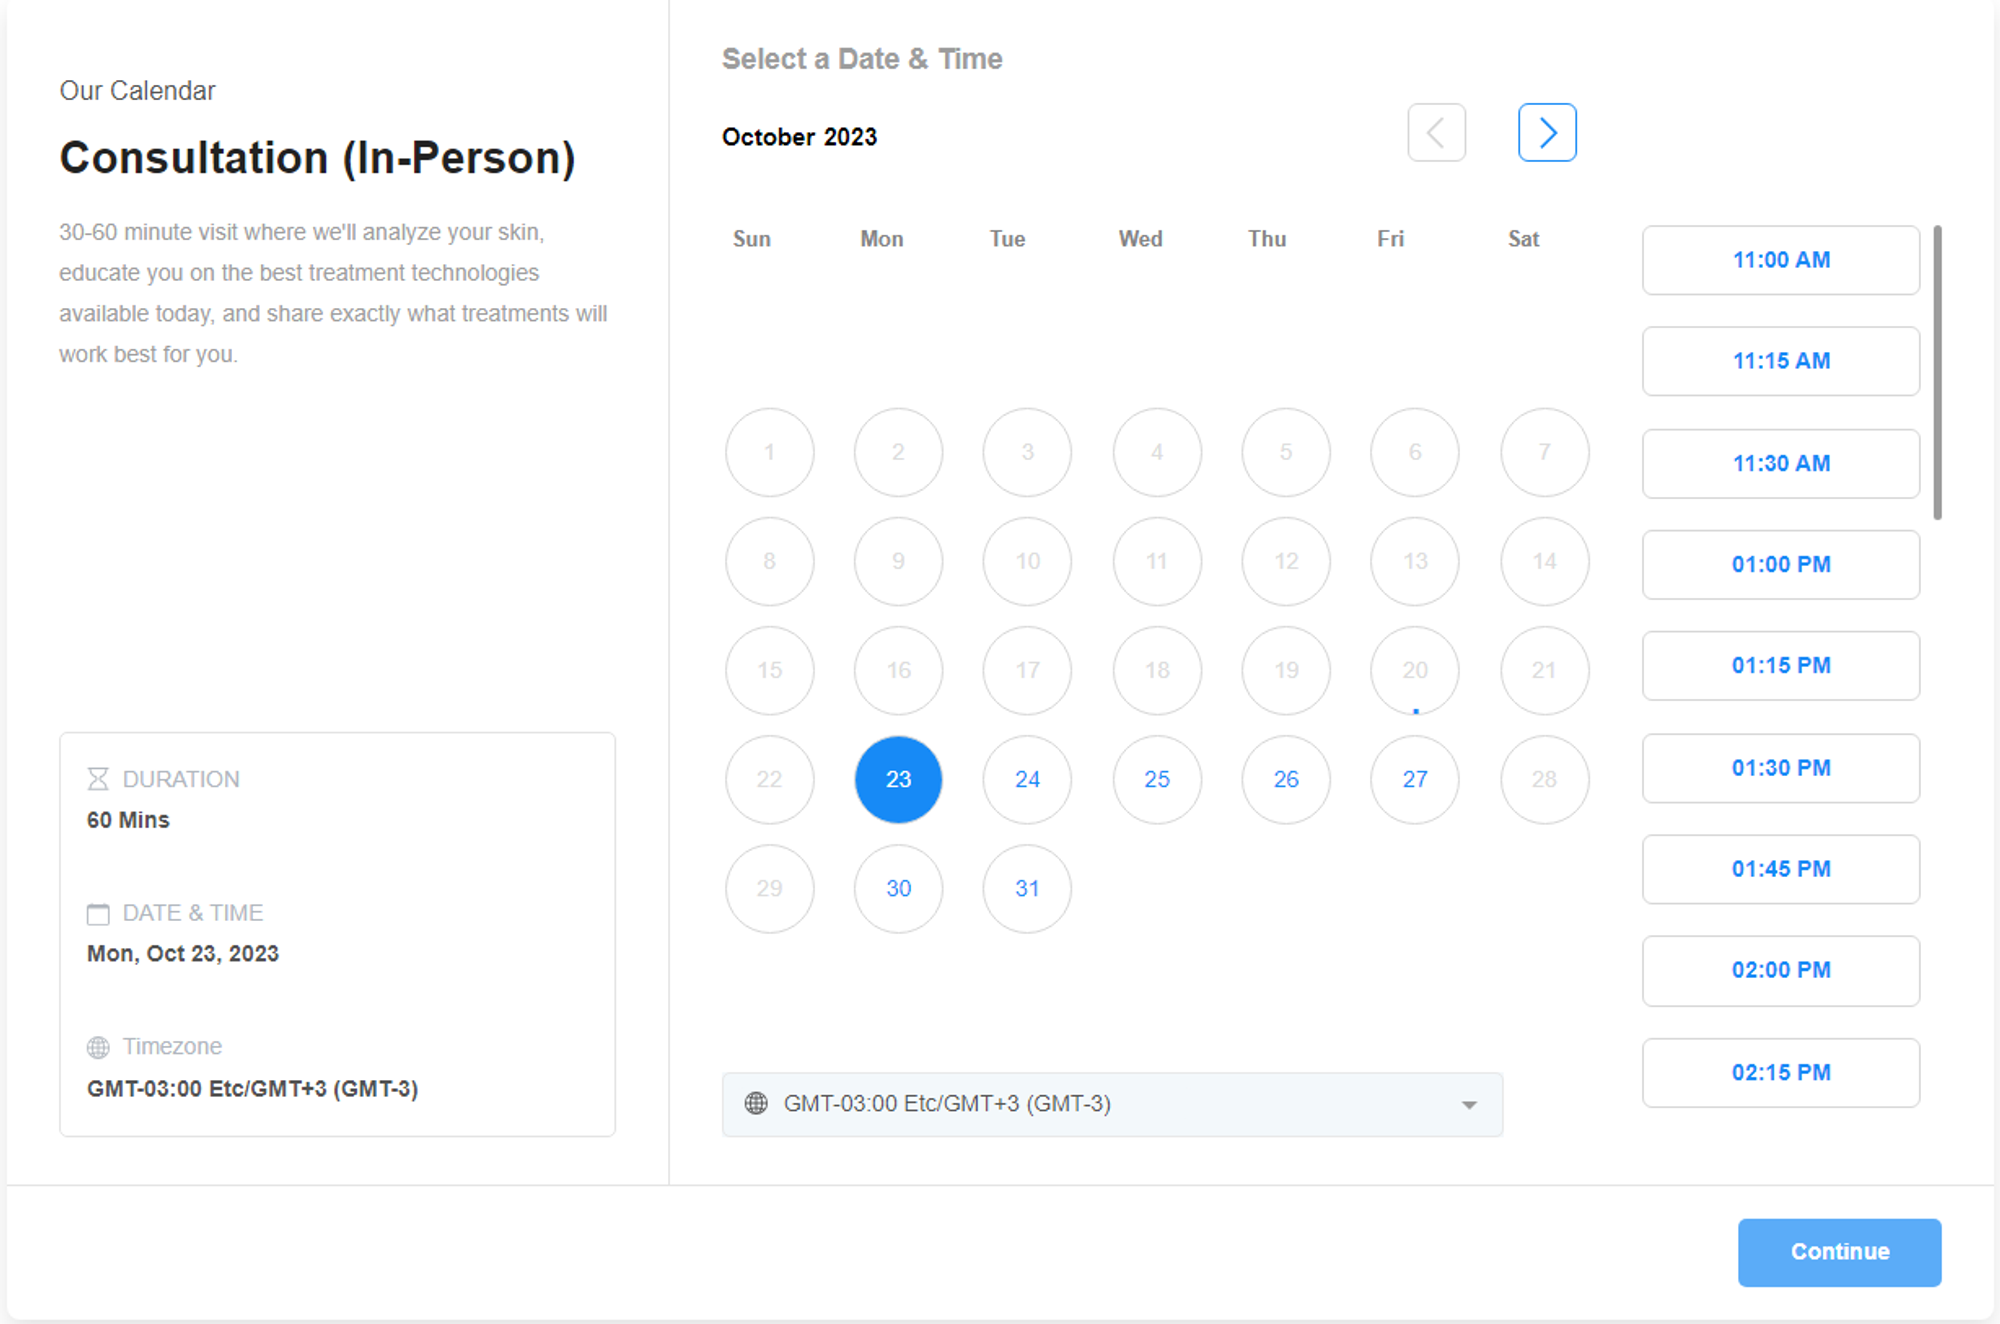
The Appointment Booking feature allows contacts to book in-person or virtual consultations directly with your clinic. Appointment Booking syncs with your clinic's calendar and displays available time slots that contacts can book.
Appointment Booking is highly customizable and includes these features (and many more):
In-person, virtual or customized appointments
Sync with one central calendar or multiple staff member calendars
Both staff members and clients can quickly and easily book appointments within a couple of clicks.
Add company branding, logo, customized text, images, and more to your calendar
Option to add to your website, ad, or booking page
Pre-requisites
Add staff members to the Forever Booked App
Click here for the tutorial.
Logging in and configuring your account
Click here for the tutorial.
Step 1: Configure Your Calendar(s)
Finding your Calendar
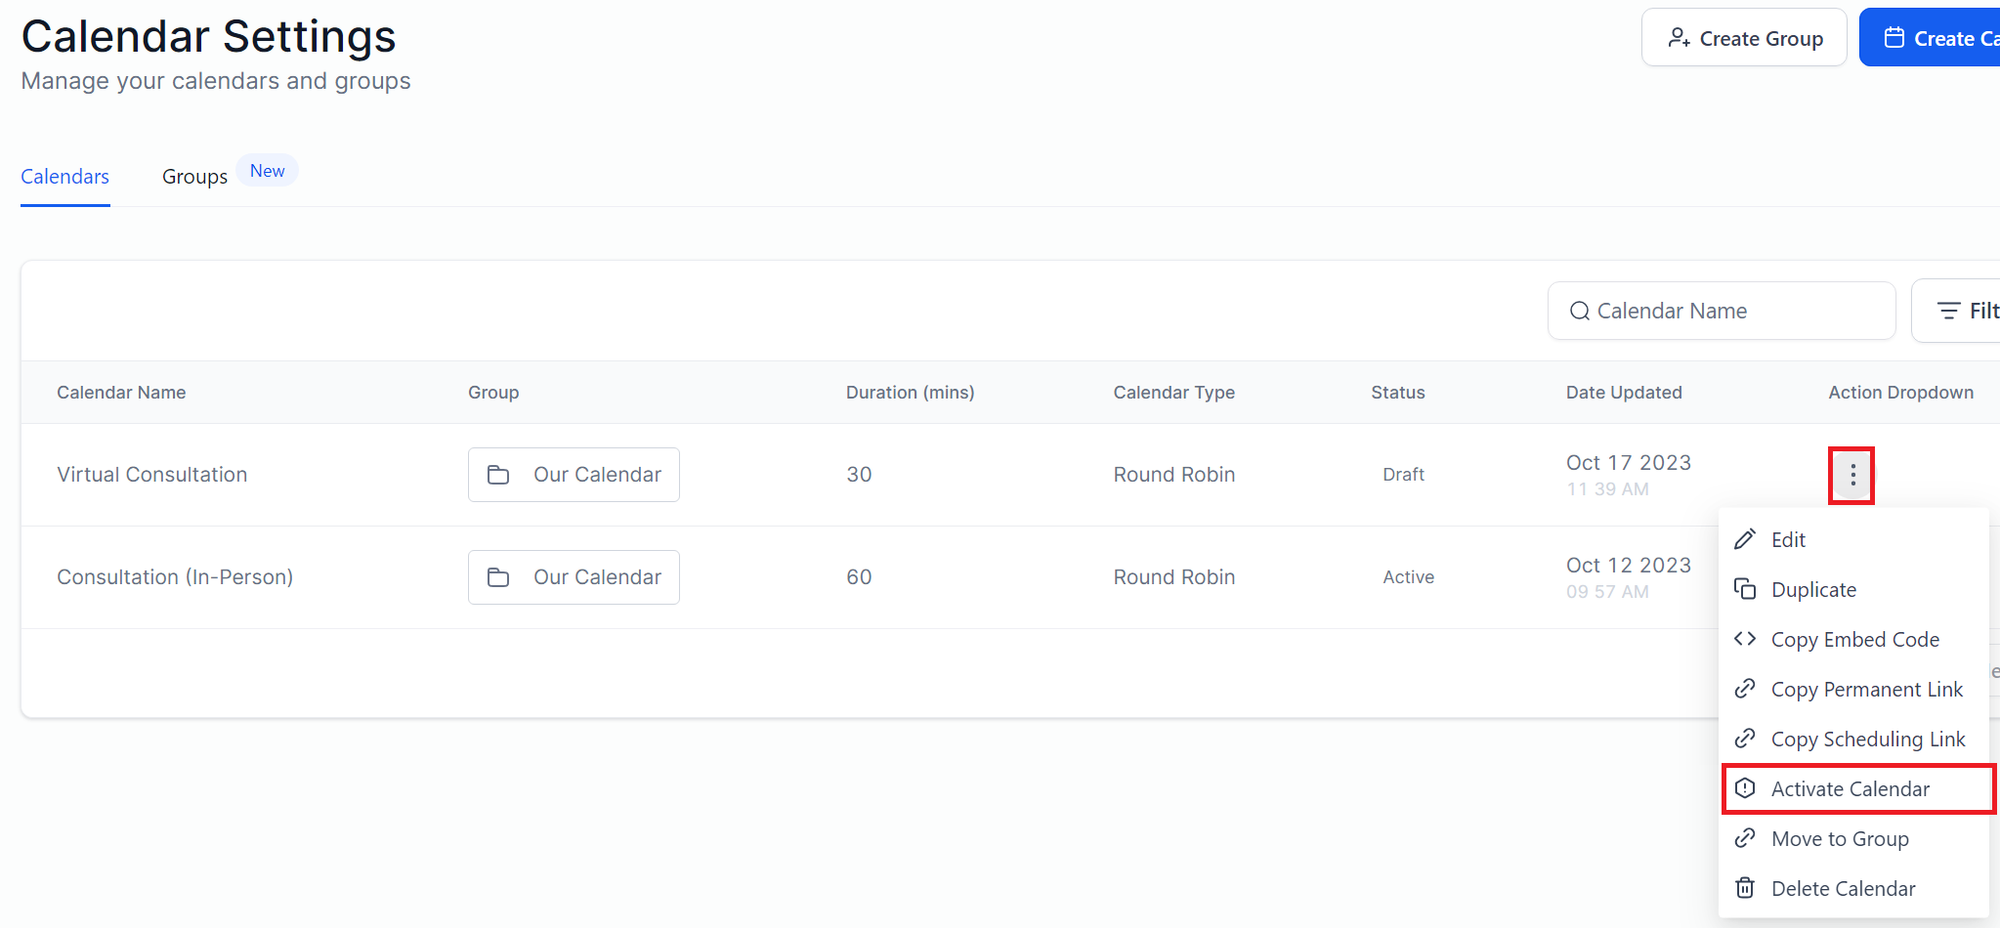
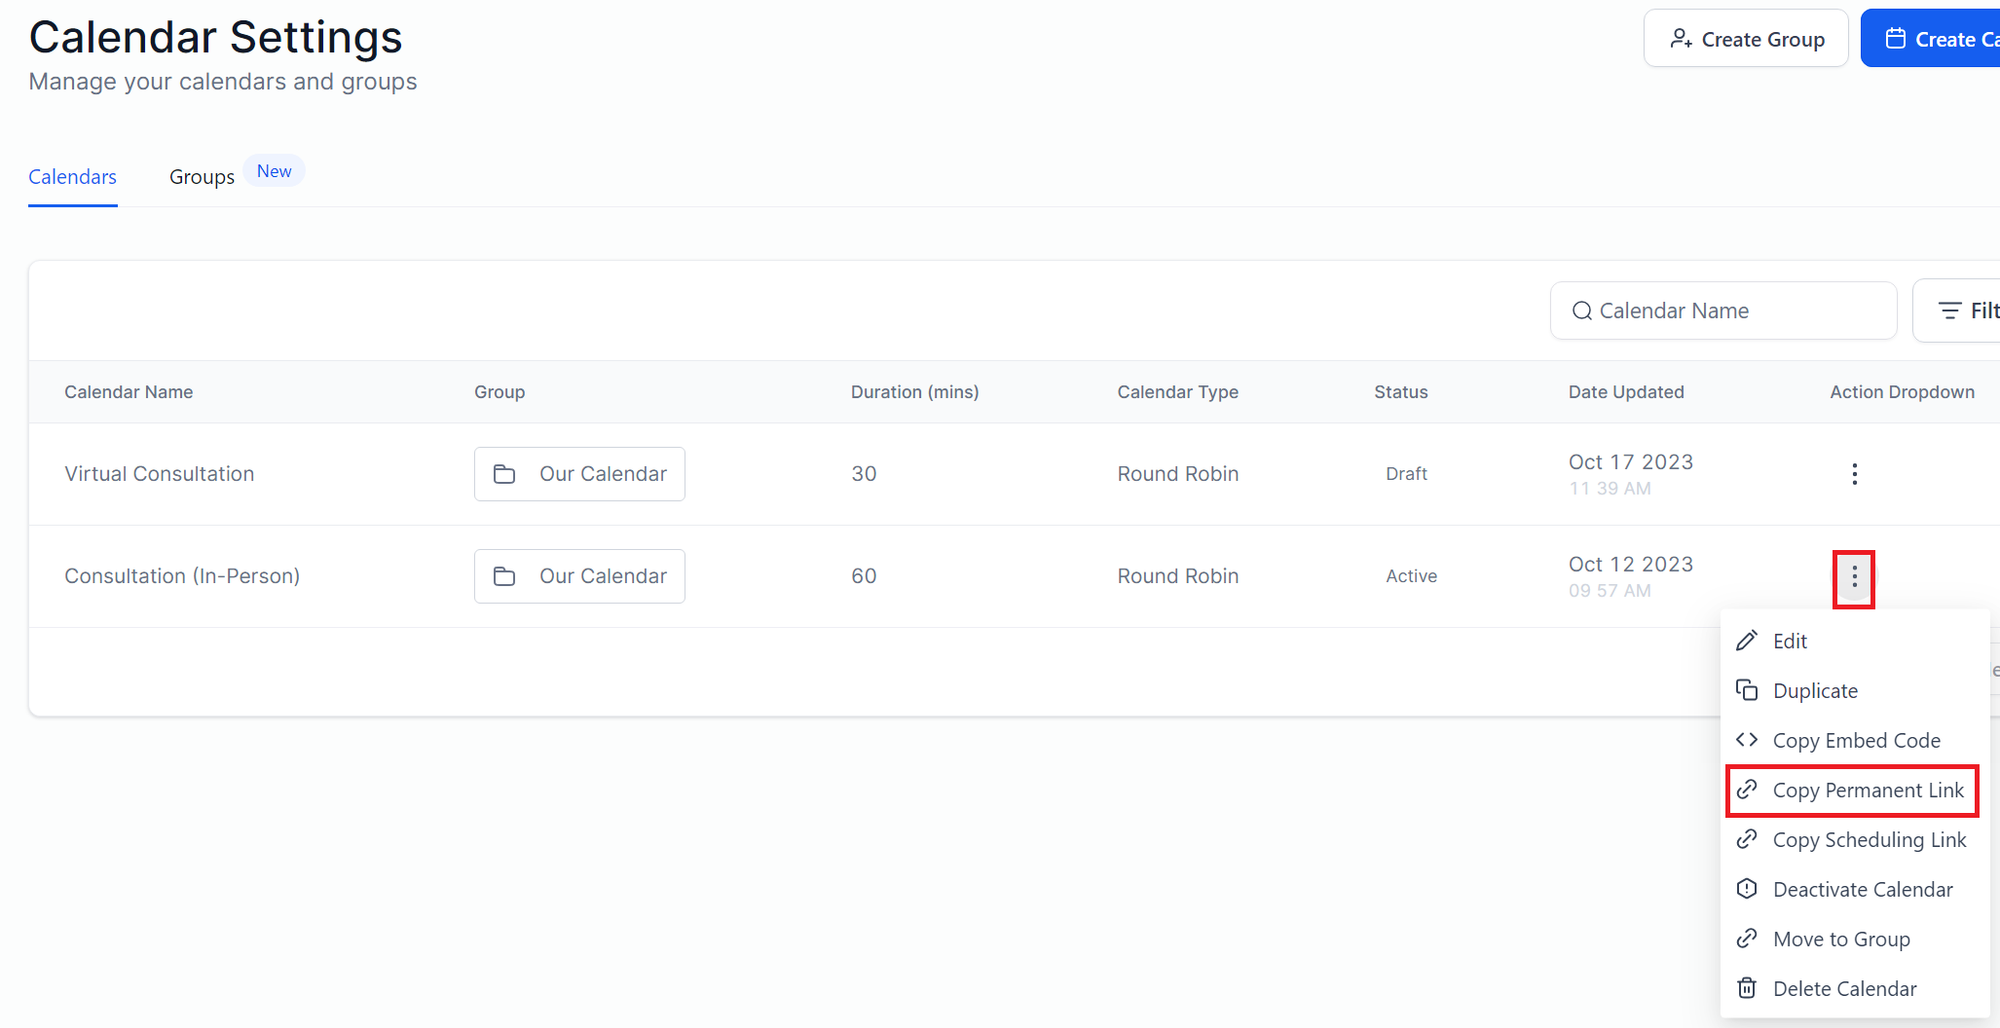
Within the Forever Booked App, go to “Settings” → “Calendars”. Here you can set up Virtual Consultation and In-Person Consultation Appointments. Right-click on the 3 dots next to the appointment type you want to set up and click “Edit.”
Filling out Meeting Details
Video Walkthrough
Fill out your meeting details as shown in the image below:
Red - Mandatory
Yellow- Optional
Gray- Do not edit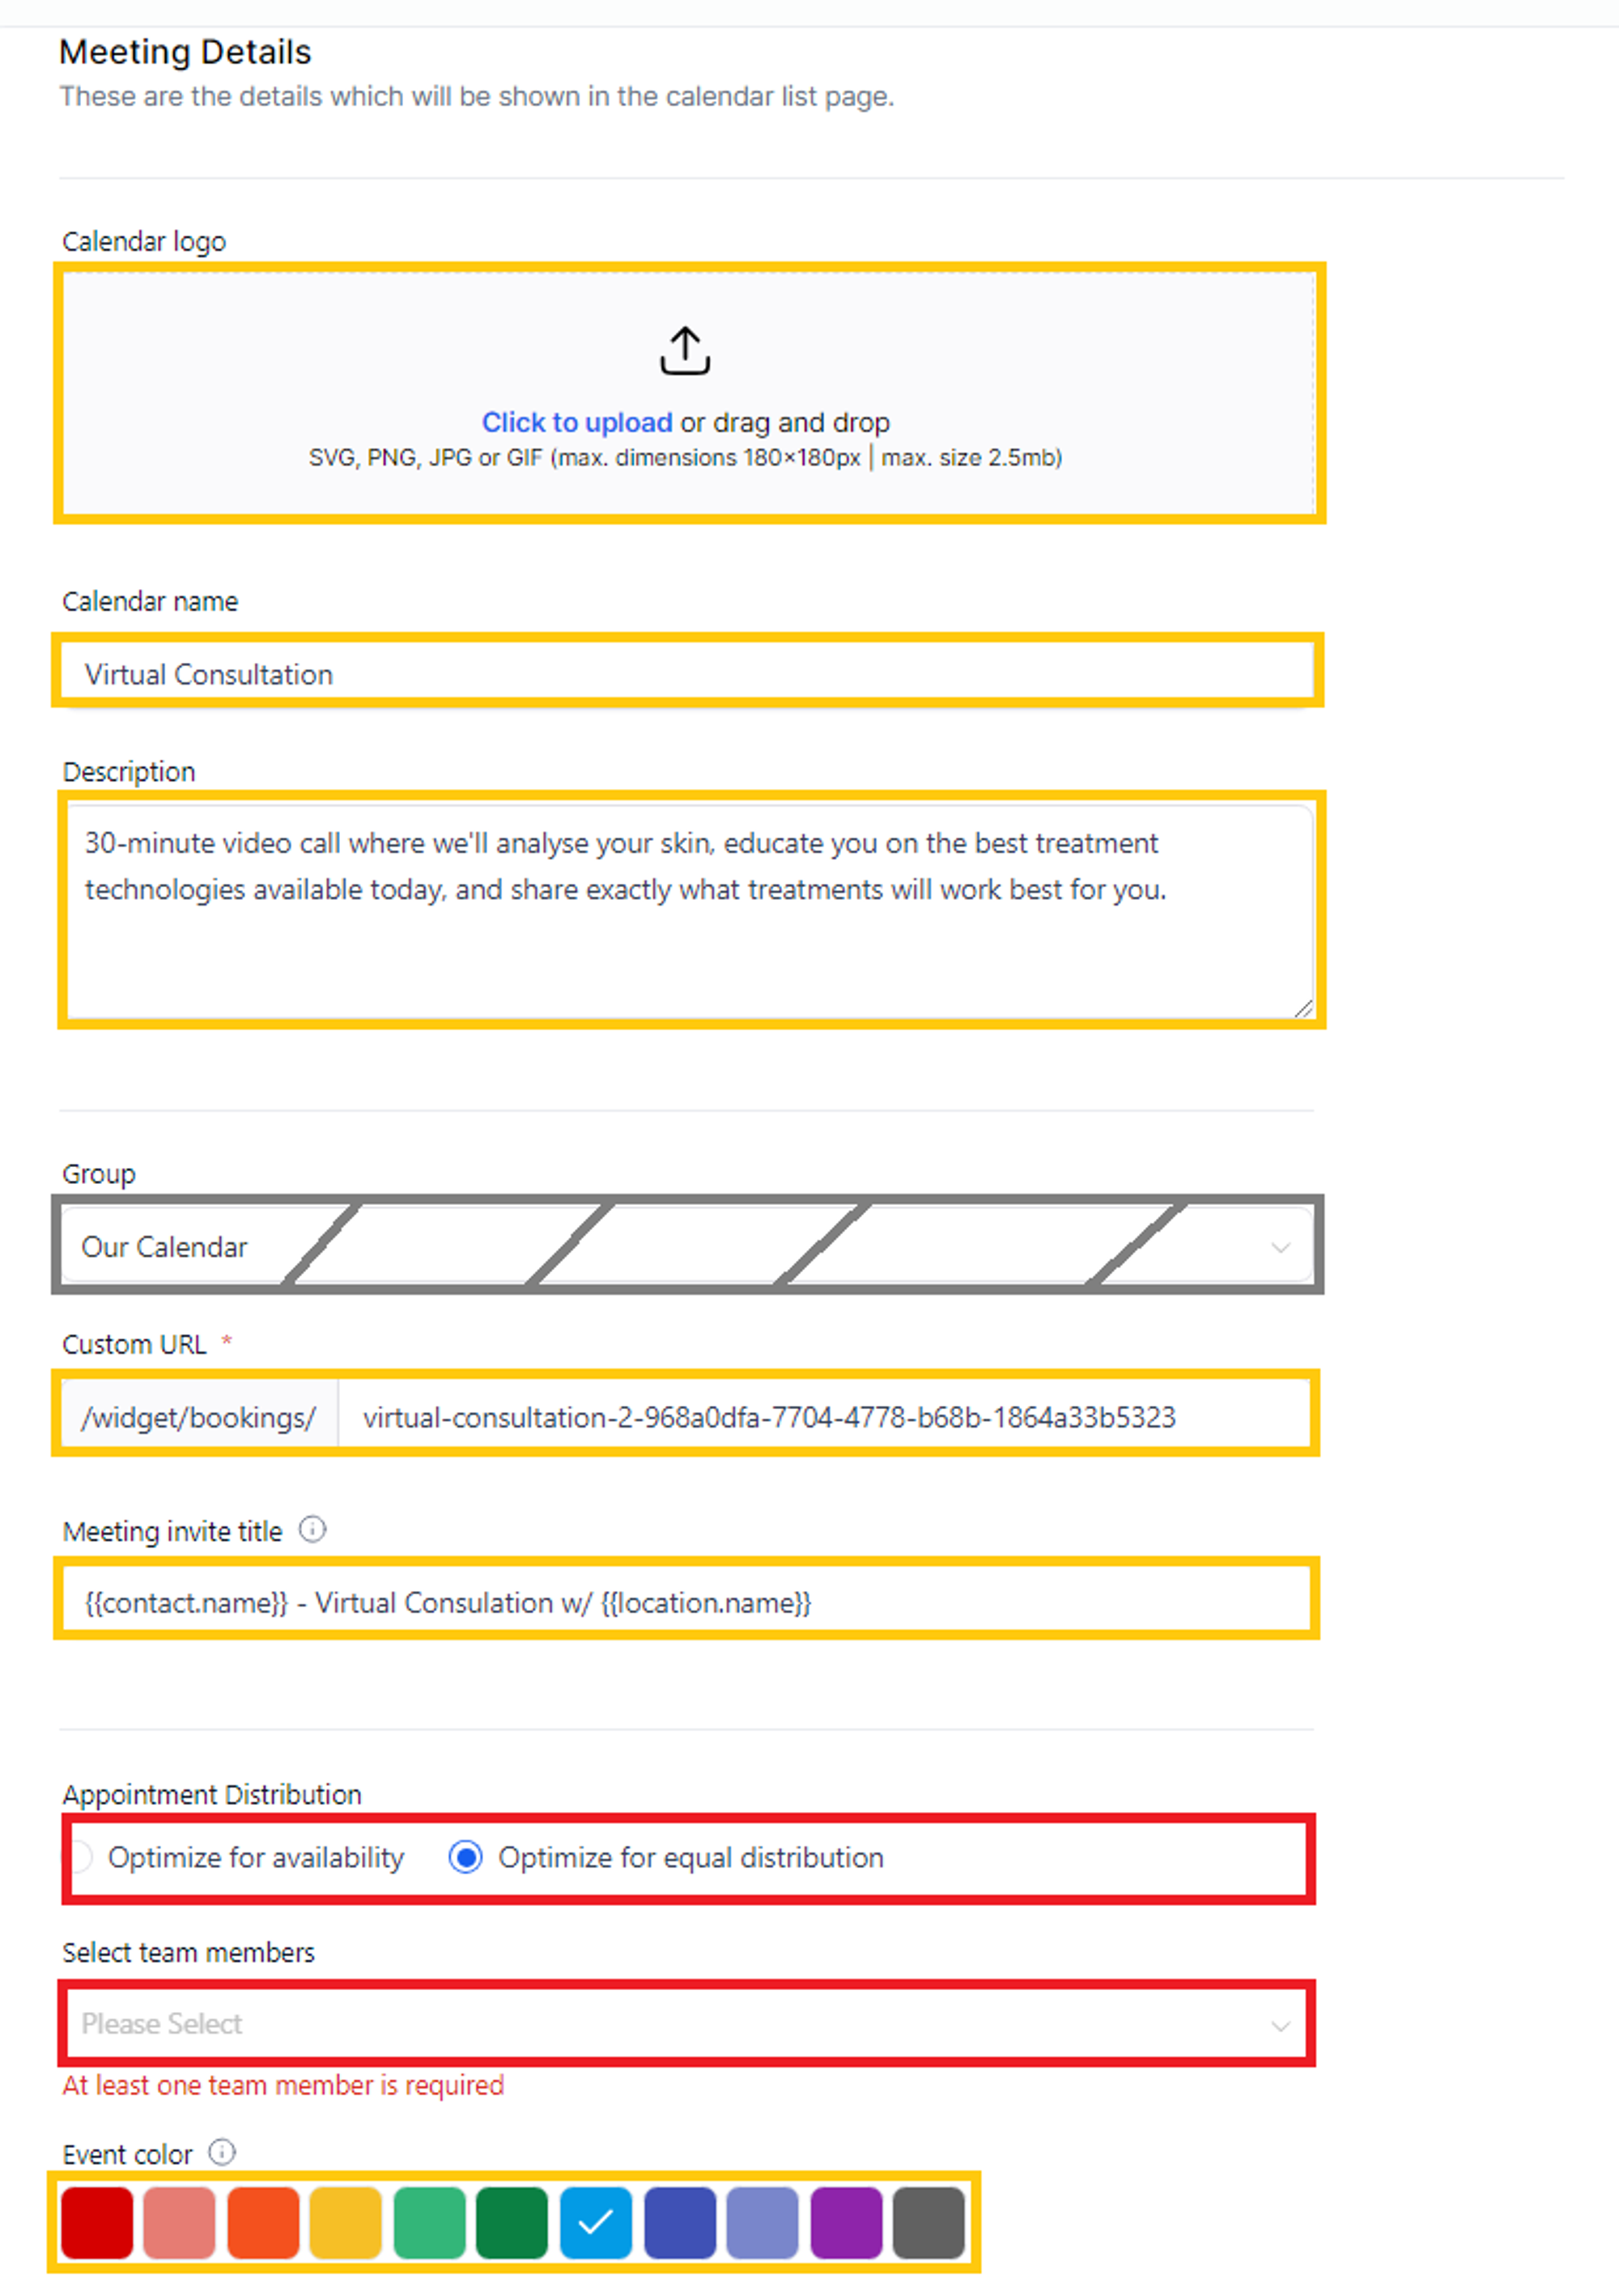
Mandatory Fields
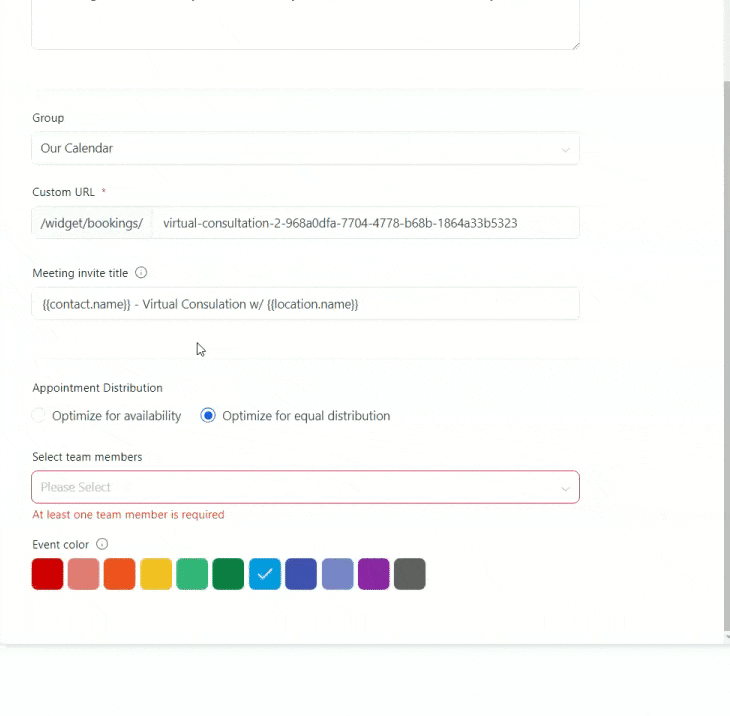
Appointment Distribution (Mandatory)
Optimize for availability - Choosing this option will assign appointments based on who has more availability.
Optimize for equal distribution - Choosing this option will assign appointments equally between staff members.
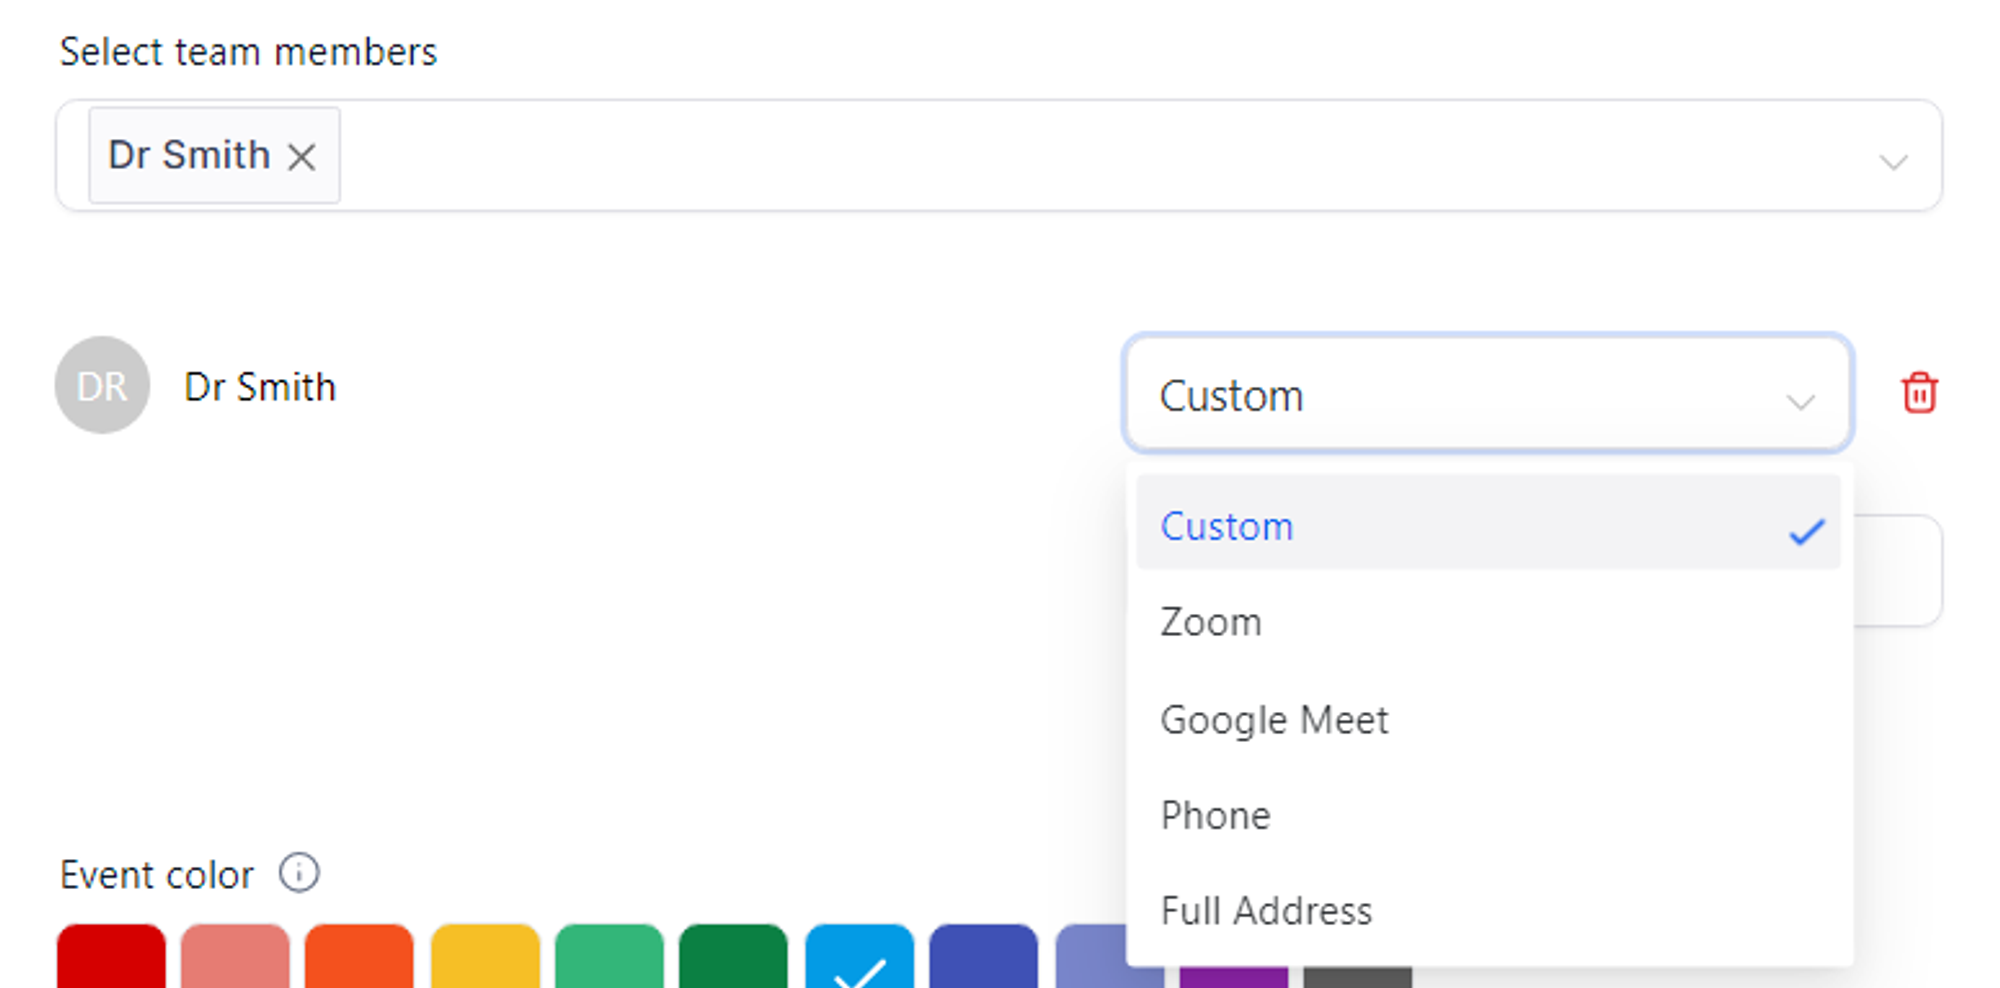
Select Team Members (Mandatory) - Select one or more staff members you would like to assign appointments to. Staff members need to be set up to appear here. Please “Pre-requisites” at the start of this guide for more information on this.
Optional fields
Calendar Logo (Optional) - You can choose to add a logo to your calendar by dragging and dropping or clicking “Click to upload.”
Calendar Name (Optional) - As default this will be set to either “Virtual Consultation” or “Consultation (In-Person).” You can choose to rename this to whatever you like.
Description (Optional) - You can leave this as default or edit the message in this box.
Group - (Do not edit) - By default, it will be set to “Our Calendar.” This does not need to be changed.
Custom URL (Optional) - Here you can set a custom URL for your form. You can leave it as is, or change it to something more friendly like consultation-mycompanyname.
Meeting invite title (Optional) - This is what the meeting name will appear like in your calendar. By default, it will show the name, meeting type, and location.
Event Color (Optional) - Here you can select a color to assign to team members.
Once you have selected your team members or shared the calendar for booking appointments, we now need to set a Meeting Location. Using the drop-down box, you can select a default location for the meetings to take place.
Other Fields
Virtual Appointment - you can choose Zoom, Google Meet, or Custom for virtual consultations. Please note that users will need to integrate their Zoom or Google accounts as part of the pre-requisite steps (above) to select this option. Alternatively, you can set a custom location, and input your personal meeting room ID into this field. Steps on how to find your Zoom personal meeting ID can be found here
Phone Appointment - Select "Phone" to use your business line, or “Custom” to input a custom number.
In-Person Appointment - Select “Location” to use your location saved on our system. This will auto-populate “{{location.full_address}}” and does not need to be changed. Alternatively, select “Custom” and type in a custom location.
Priority (Optional) - If “Optimize for Availability” is selected in the appointment distribution settings, you will have an additional option to prioritize staff members for distribution.
Event Color (Optional)- Here you can choose a color for how you would like your calendar to appear.
Once complete, click “Save” at the top right to continue to the next steps.
Setting your Calendar Availability
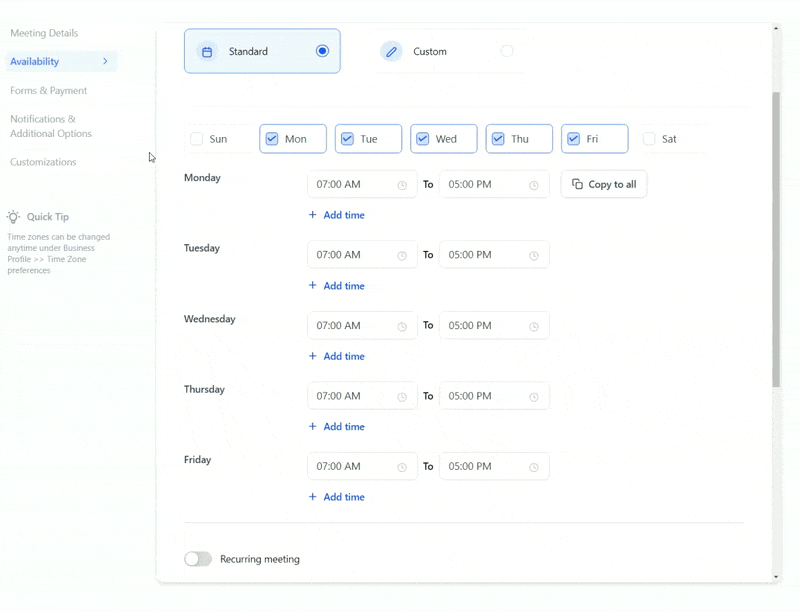
Set the Availability of your Calendar
In this section, you can set the availability for your Virtual or In-Person Appointments. Please note that staff members will set up their own availability in a different section when they set up their account. Clients will only be able to book appointments within the times set by the staff members.
You can set either wide parameters to accommodate all staff members' working hours, or your clinic's hours. E.g. 8:00 am-6:00 pm, Monday to Saturday.
Once you have set the desired times for your clinic's Virtual or In-Person Appointments, click "Save" at the top right corner. You can then select "Close" at the top right to proceed to the "Activate your Calendar" section. If you desire further customizable options such as payment options, custom notifications, additional notes, and more, continue to the Optional Fields section below.
Set the Availability of your Team members
In the "Pre-requisites" step (mentioned above), your staff members can set their available times, for example, 10:30 am to 5:00 pm, Monday to Saturday (excluding Tuesday). When a client goes to book, if you have only one staff member, the client will only be able to book within that staff member's available times, such as 10:30 am to 5:00 pm, Monday to Saturday (excluding Tuesday). Admins can also adjust staff member availability by navigating to Settings → My Staff and clicking “Edit” next to their name.
Optional Fields (Forms & Payment, Notifications, Customizations)
Here you can set optional choices like payment options, custom notifications, additional notes, and more, You can choose to skip this section by clicking “Save” then “Close” or continue reading to customize these sections:
Forms and Payment
Notifications & Additional Options
Customizations
Allow Staff Selection Allow Cancelation Link
Activating Your Calendar
When you are ready to activate your calendar, go back to Settings —> Calendars and click on the 3 dots next to the calendar you want to activate. Next, click “Activate Calendar.” Once complete, your calendar will be live!
Step 2: Test Appointment
Find your Booking Link
Individual Calendars - You can find your booking link by going to Settings —> Calendars. Next, click on the 3 dots next to your chosen calendar then select “Copy Permanent Link.”
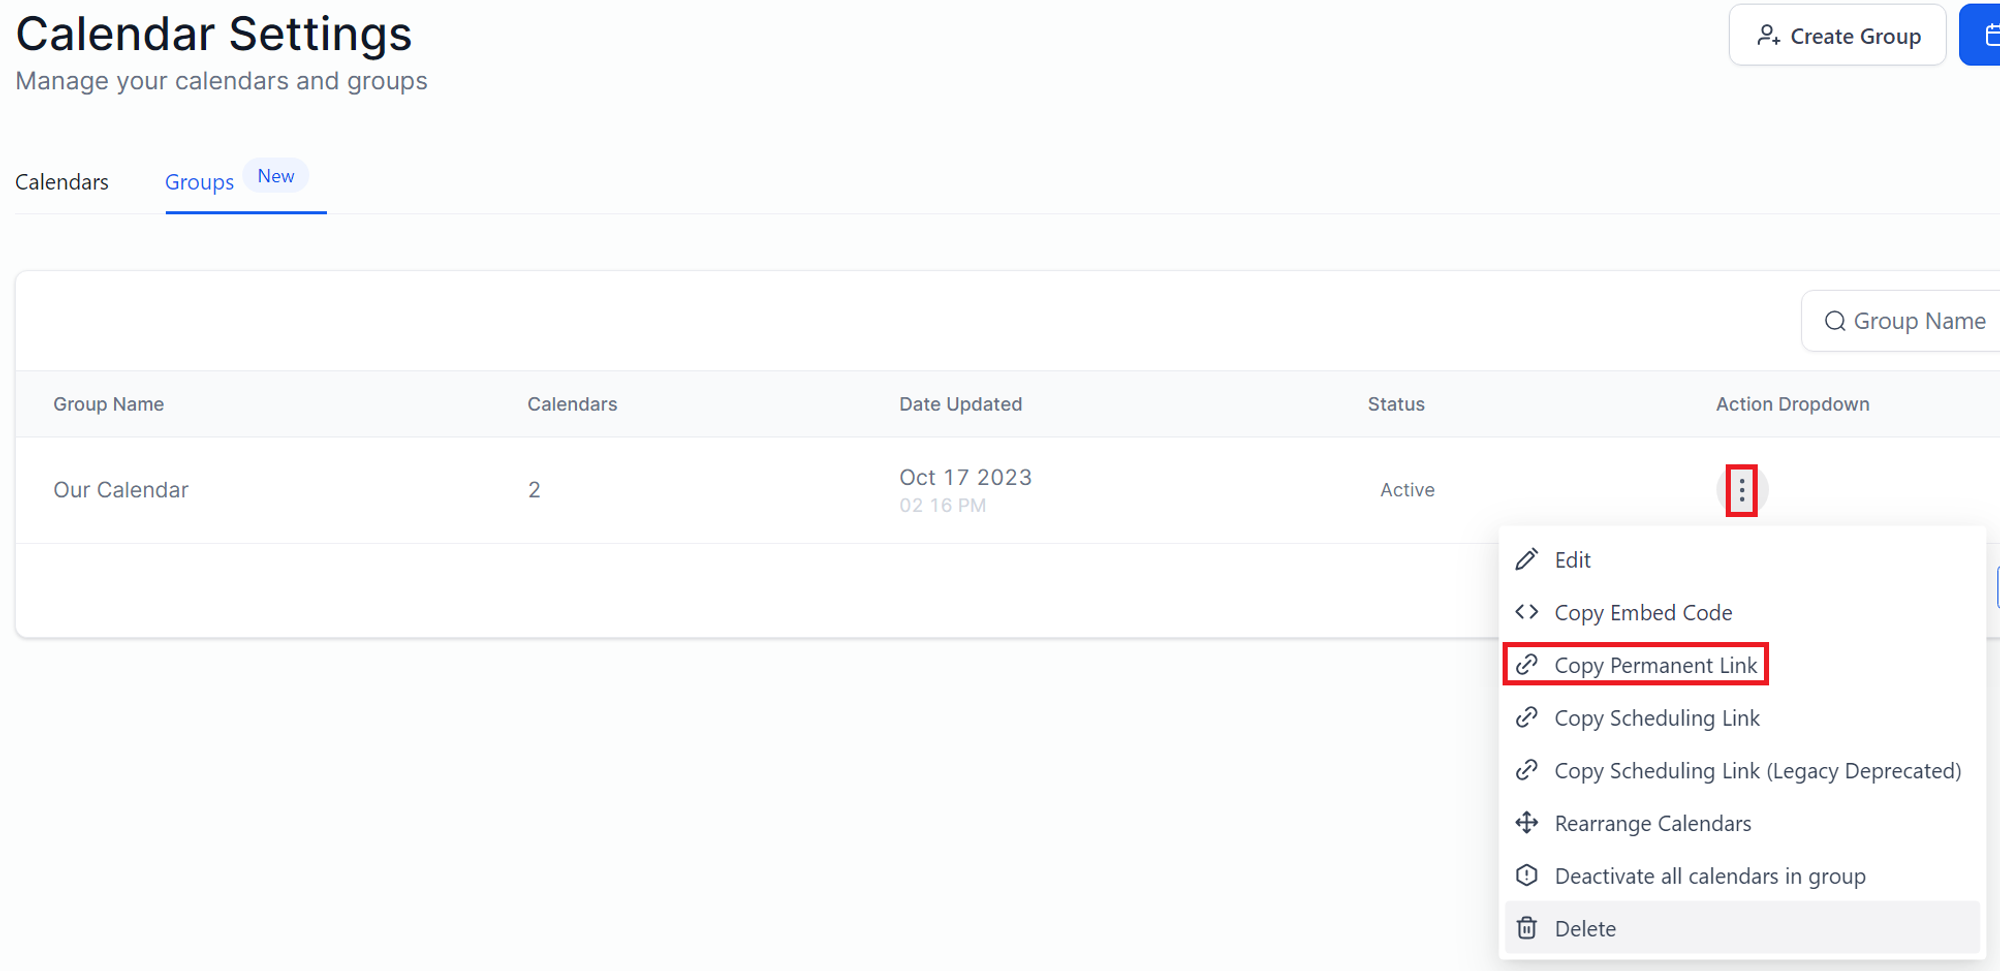
Calendar Group - You can also find a link to your booking group page. This is helpful if you would like to provide a link where clients can choose between Virtual and In-Person Consultations. You can find this link by going to Settings —> Calendars —> Groups. Next, click on the 3 dots next to “Our Calendar” and select “Copy Permanent Link."
Testing your Booking Link & Pipeline
Open your booking link in a new tab or window and follow the steps to make an appointment. Then, check if you received the confirmation text and email.
Next, in the Forever Booked App go to "Track Leads" and see if your new booking is displayed under the “Appt Booked” pipeline stage.

Step 3: Send to Forever Booked for Review
After completing the steps, complete the Add-On Request Form HERE.
We will go ahead and double-check to make sure everything is working correctly and will notify you once the system is ready to use.