Meta Setup & Integration
#1 Integrate an Ad Account With GHL
To start launching your ad campaigns, connect your ad account with your Forever Booked account by following these steps:
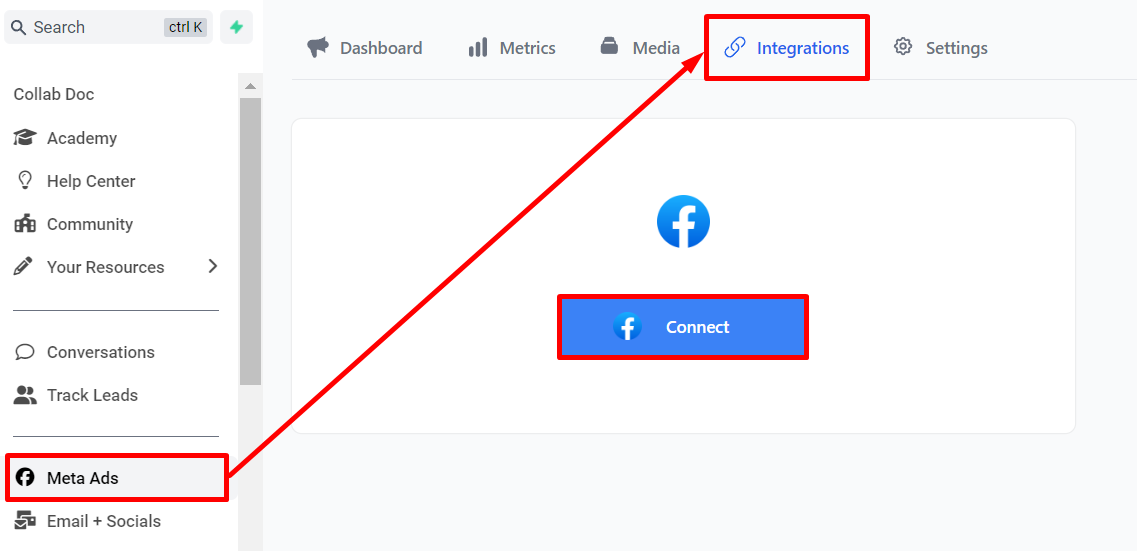
1. Start by opening the Forever Booked software at app.foreverbooked.com, clicking the "Meta Ads" tab, and then clicking "Integrations" tab. Click the "Connect" (to Facebook) button. Follow the prompts to connect your ad account.
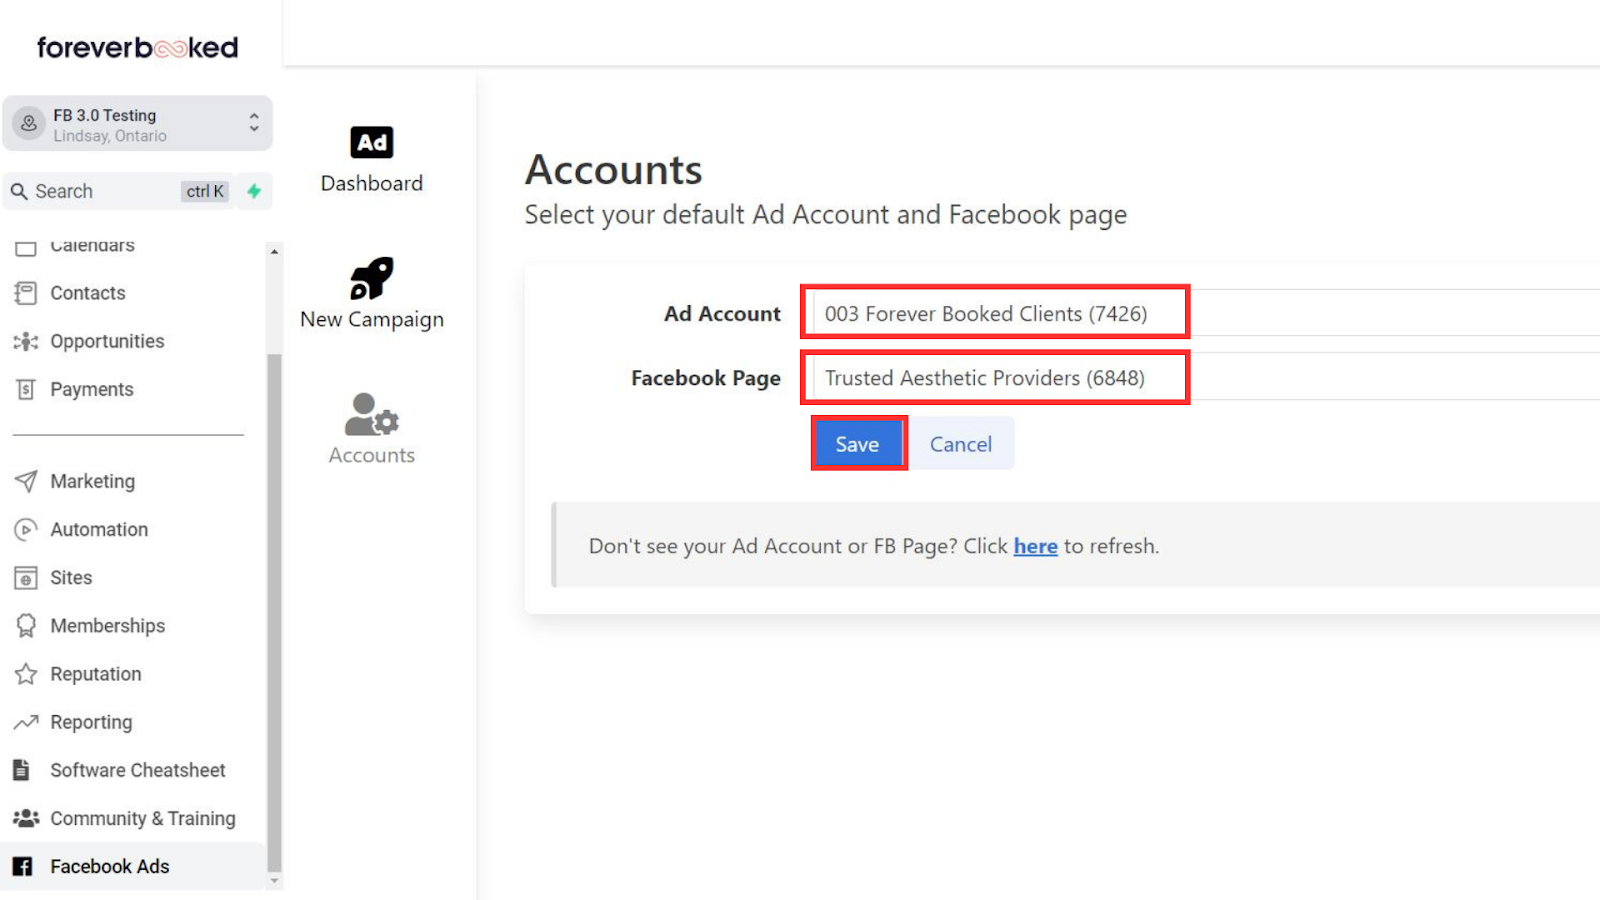
2. Once connected, ensure the Ad Account and Facebook Page you would like to advertise from are selected, then click Save.
#2: Integrate A Facebook/Instagram Page Messenger With GHL
To enable receiving and managing all messages from Facebook Messenger through the Conversations tab of your Forever Booked account, follow these steps:
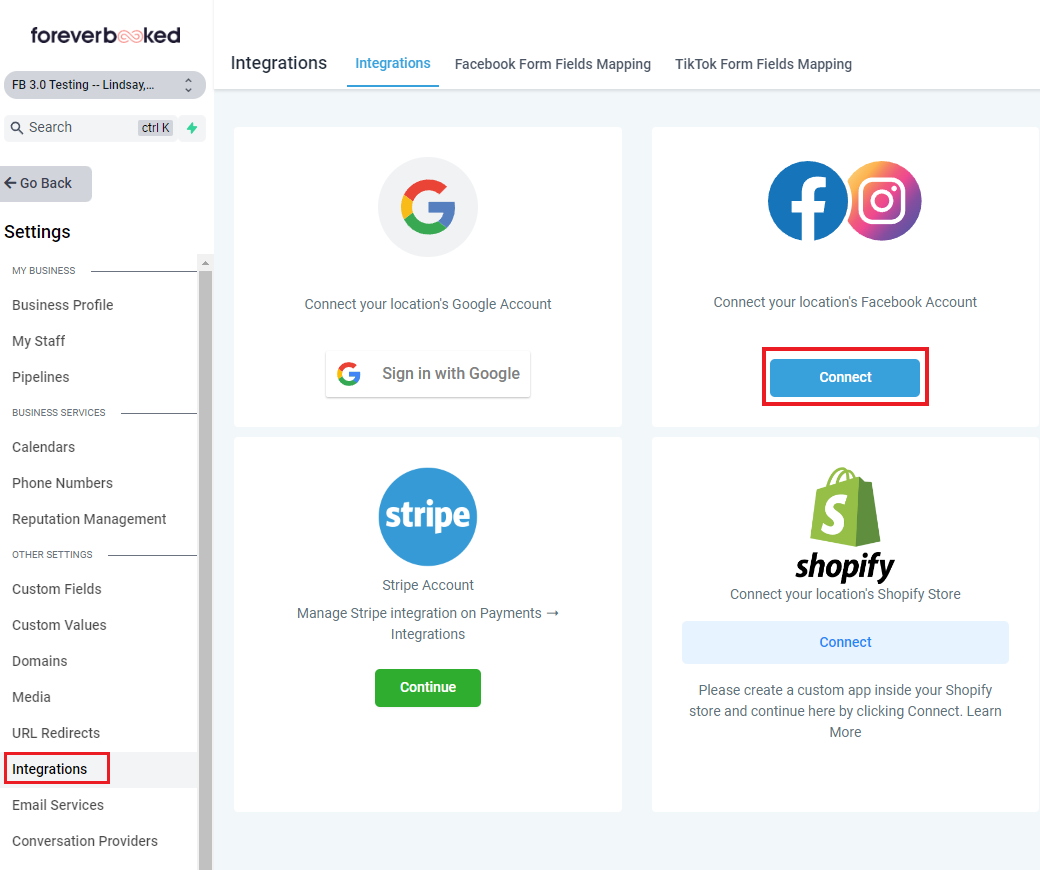
1. Click "Settings" at the bottom of the sidebar and click "Integrations."
2. Locate the "Facebook/Instagram" integration option and click "Connect" to initiate the connection.
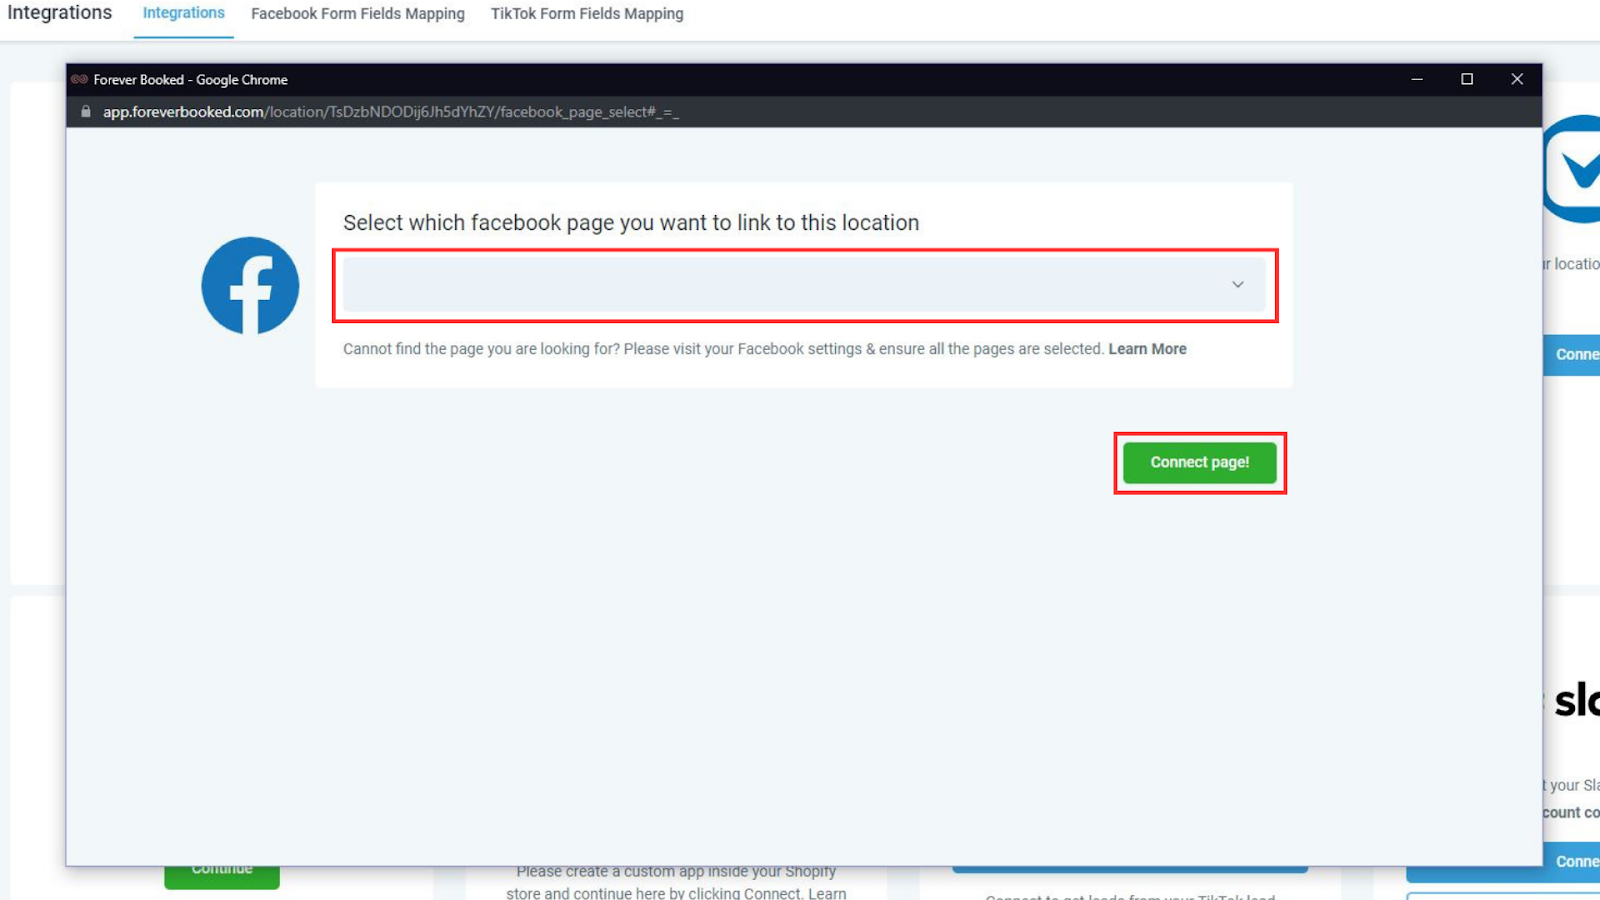
3. Follow the prompts to connect your Facebook Page, which will automatically detect its linked Instagram Page. Make sure to select the correct Ad Account and save your changes.
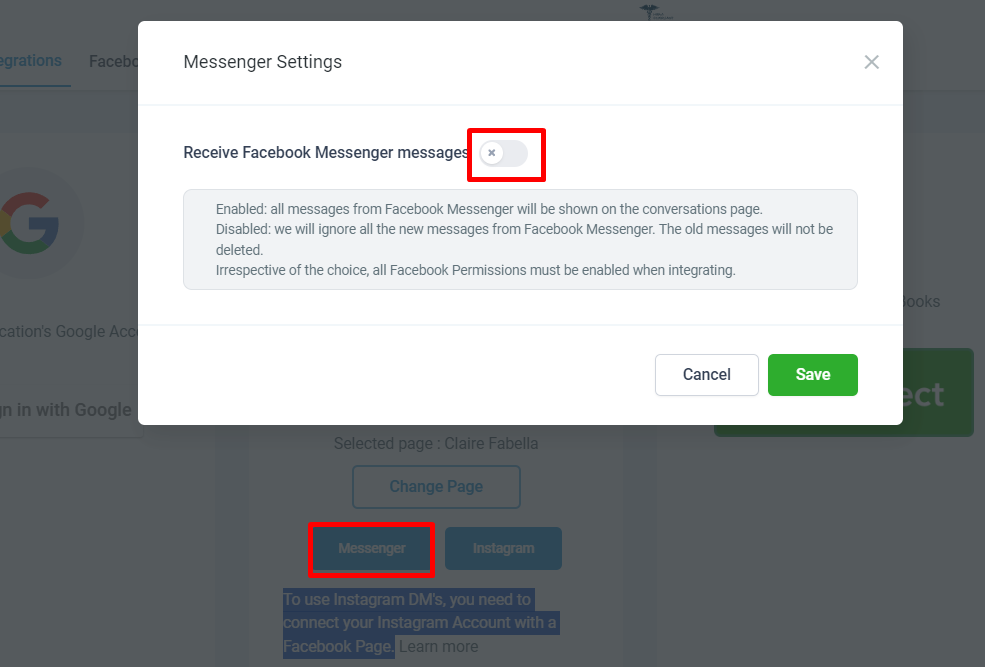
4. Click the "Messenger" button then click the toggle icon to enable receiving messages from Facebook Messenger. Click "Save."
#3 Add Payment Method To Ad Account
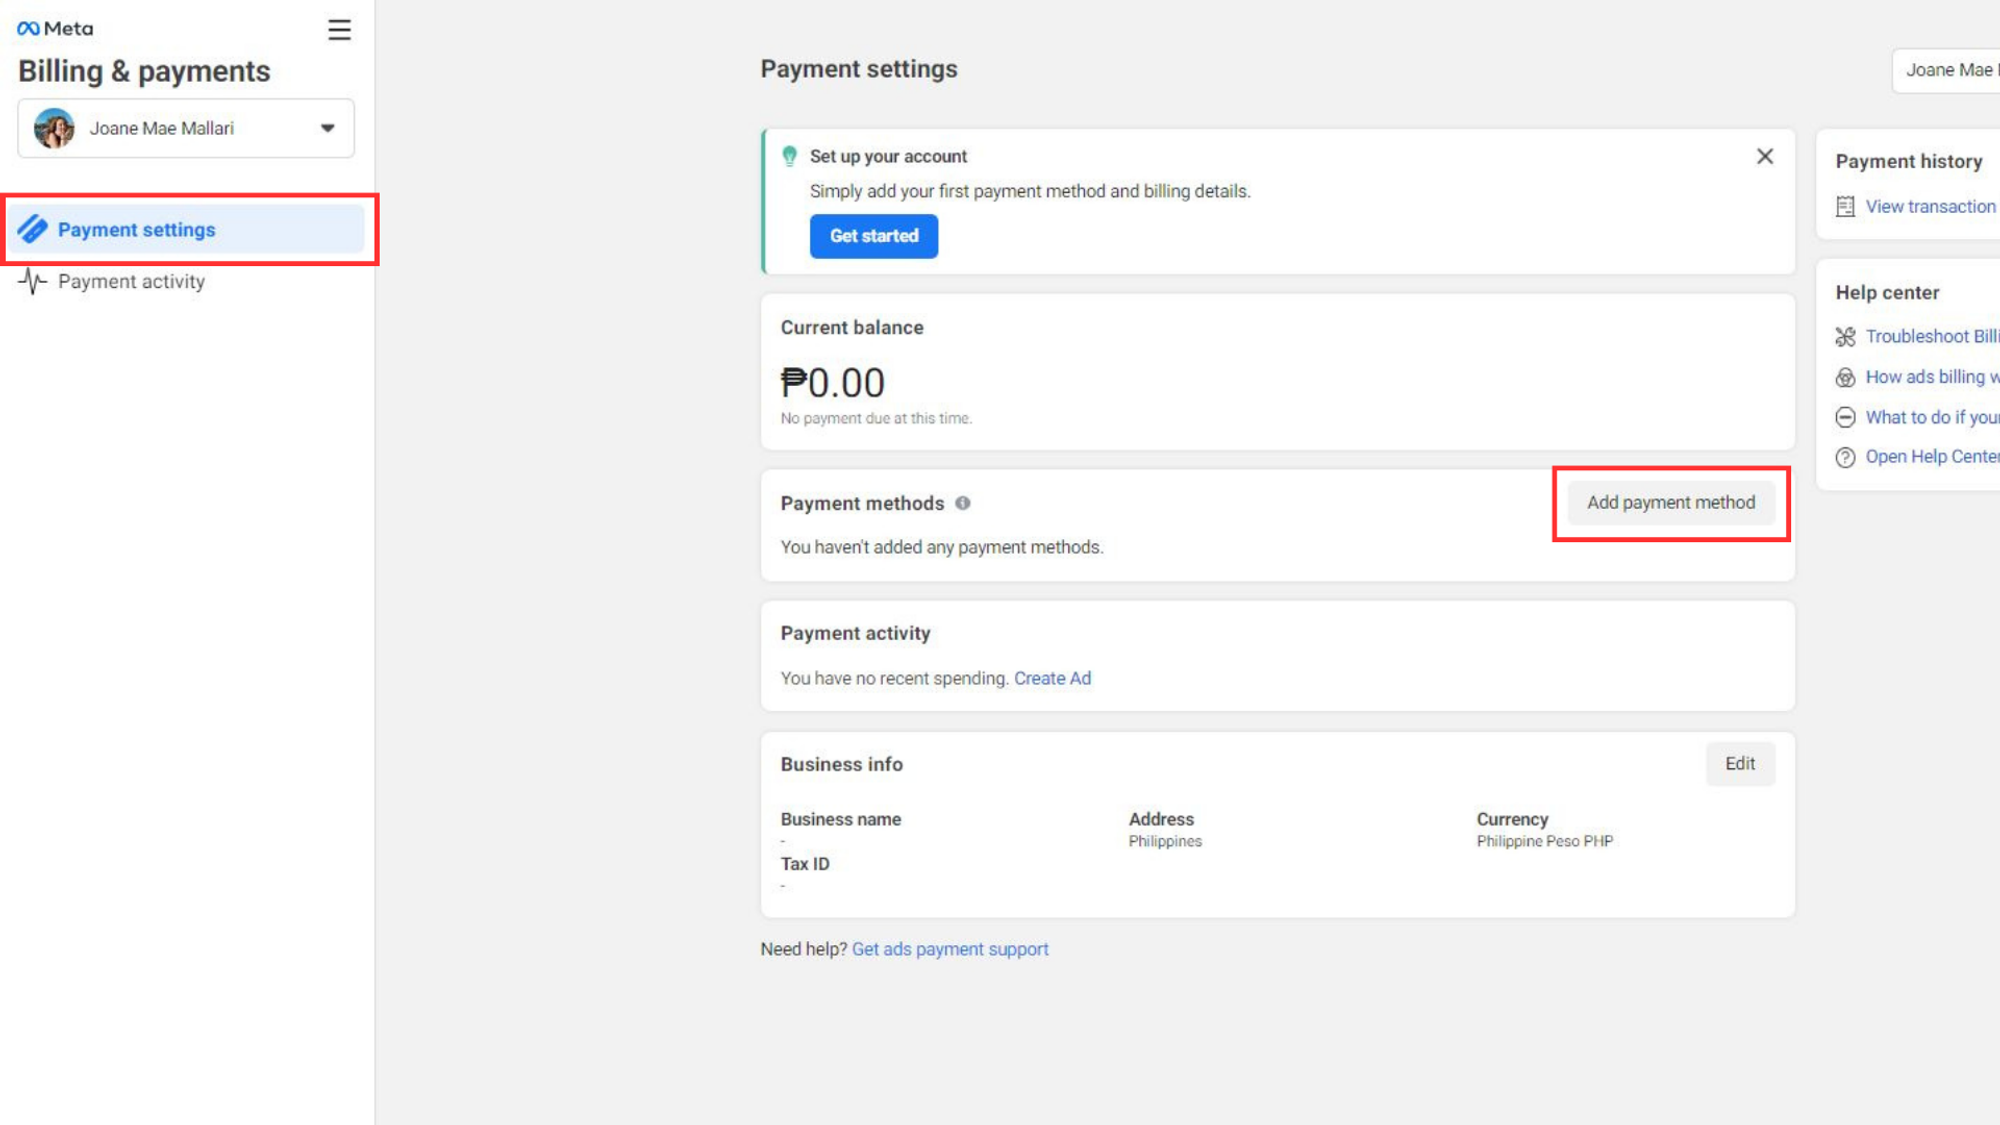
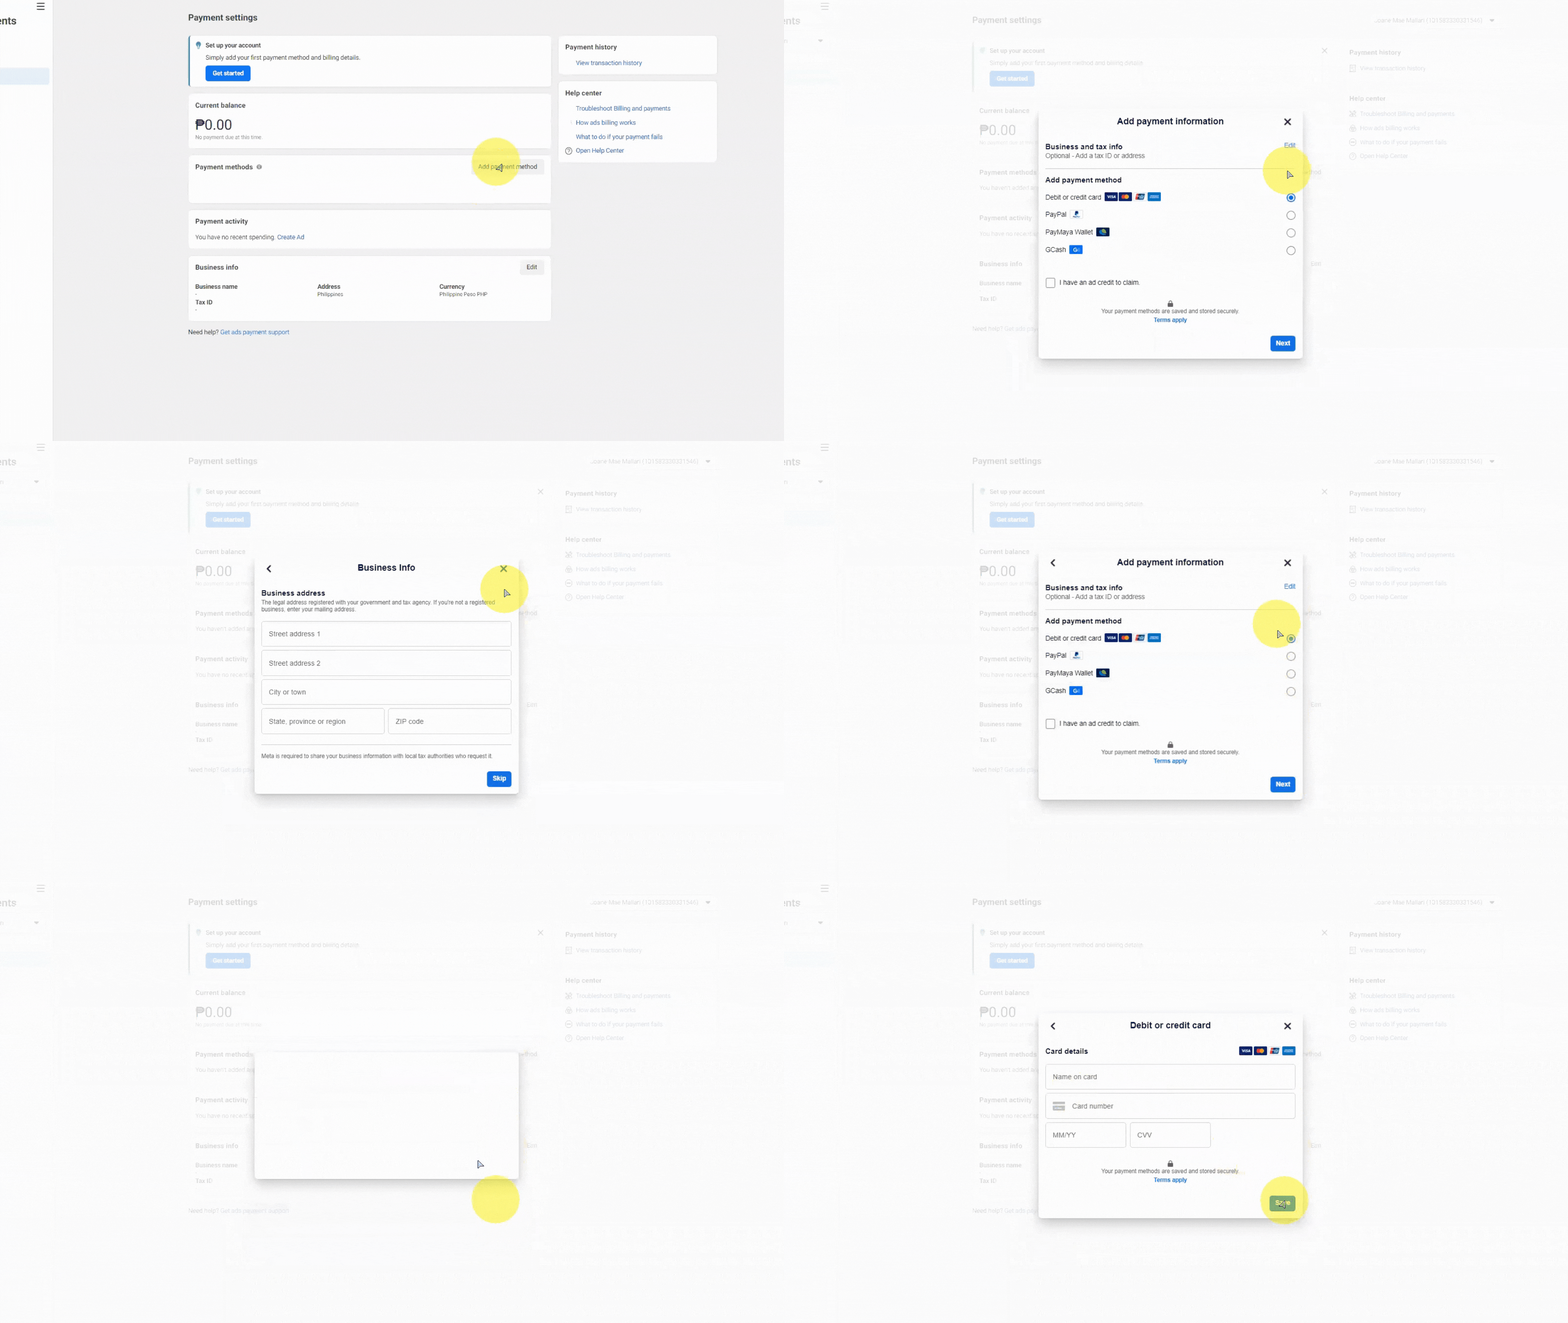
Go to Billing → Payment Settings, in your ad account and click on it to access the payment options. In the Payment method section, click on "Add payment method" to begin the process.
Next, choose the payment method you want to add from the available options and click "Next." You'll have the opportunity to review and update the billing information in the Edit billing information form. Make any necessary changes, or simply verify that the details are correct. Once you're satisfied, click "Next" to proceed.
Finally, you'll reach the confirmation step. Click Save to complete the process. Your new payment method will now be successfully added to your existing ad account.
Preventing Ad Account Restrictions
Preventing shutdowns, and improving account recovery are accomplished by taking steps to clearly show that you are a trustworthy advertiser, and minimizing the risk factors which trigger Facebook's moderation algorithm. We recommend following our initial prevention steps and avoiding the most common preventable risks.
Initial Prevention Steps
Step #1: Confirm your identity
This puts you into a bucket of “confirmed” accounts, which Facebook views as more trustworthy.
Go to https://www.facebook.com/id/ . You will be asked to upload your ID. The ID is reviewed by a bot, so make sure that it is a clear, well-lit image.
Step #2: Enable 2-factor authentication
This will decrease the likelihood that Facebook thinks you could be hacked, thereby increasing your trustworthiness and decreasing your shutdown probability.
Instructions
Go to your Security and Login Settings.
Scroll down to Use two-factor authentication and click Edit.
Choose the security method you want to add and follow the on-screen instructions.
When you set up two-factor authentication on Facebook, you’ll be asked to choose one of three security methods:
Tap your security key on a compatible device.
Login codes from a third-party authentication app.
Text message (SMS) codes from your mobile phone.
Once you've turned on two-factor authentication, you can get 10 recovery login codes to use when you're unable to use your phone. Learn how to set up recovery codes.
Step #3: Complete steps #1-2 for anyone connected to your ad account
This is very important as anyone connected to your account is seen as a potential security risk. If someone cannot complete these actions (or is no longer connected with your business) remove them from your page or account.
Managing Ad Disapprovals
Ads might be disapproved due to an error in the algorithm, or because they genuinely violate policies. If your ad gets disapproved, please notify our team immediately. We will assess your account and let you know what to do next.
Depending on the situation, we will advise you to:
1: Correct errors and republish the ad
2: Request a second review of the ad if we do not see any errors
3: Delete the ad if it has been rejected after a second review
Managing Restrictions
Restrictions can be placed on your Meta Business Account, Ad Account, Facebook Page, or Personal Facebook Account. Whichever restriction you receive, the recovery steps remain the same. If you're confident, you can do it independently, or we can guide you through the process on Zoom!
Account Recovery Steps:
Go to Meta Business Support Home.
Click Account Status Overview in the left menu.
Click the restricted account that you want to troubleshoot.
Look for a What You Can Do section.
In the What You Can Do section, follow Meta's recommended steps. These may include:
Confirming your identity.
Completing verification.
Securing your account.
Requesting a review.
If you can request a review, you will be given 3 options. Choose “Other” as this option ensures that your account is reviewed by a human, increasing the probability of successful account recovery compared to the first two options, which are typically reviewed by bots.
I don’t know what policy was violated
I think my account was hacked
Other
When prompted to provide further information, use this general structure:
“This was the last campaign that we ran before our account was shut down, this was our intention behind that campaign, we don’t believe it violated any policies, if we have, we will remove the campaign and make the changes necessary.”
Example
Our last campaign was to promote our Laser Facial package. We intended to collect leads for the special offer. We don’t believe we violated any policies. If we have, we will remove the campaign and make the changes necessary. Thank you!
Usually, within 24-48 hours, you will receive a notification regarding Facebook’s decision. This decision is based on:
Your history of violations
The trustworthiness of your account (account verification, 2FA, etc.)
Your payment history
The seriousness of the violation.
Navigating Permanent Restrictions
If the review is completed, and your account is still restricted and accompanied by “this is our final decision,” this means that the restriction is permanent. To run ads, you need a personal profile, a page, and an ad account. So your next steps will depend on how you were restricted.
⚠️ Do not proceed with the steps below unless you have requested a review for all of the restricted assets, and you have received a “final decision”. Otherwise, you risk further restriction for circumventing the Meta process.
Steps for each restriction type:
Restricted Page
If your page has been restricted from advertising, you have the option of creating a new one to continue advertising.
Create a new page following these instructions.
Complete the Initial Prevention Steps at the top of this article.
Once created add 5-10 posts, and wait 7 days.
Proceed with advertising from the new page.
Restricted Ad Account
If your ad account is restricted, but you still have access to your business manager, page, and profile, you can create a new ad account to advertise from.
Follow this guide, using the steps to create a new ad account.
Add a new payment method to the account.
Complete the Initial Prevention Steps at the top of this article.
Proceed with advertising from the new page.
Restricted Business Account
With a restricted business account, you can either create a new ad account outside of the business manager (instructions above), or you can create a new business manager.
Follow these instructions to set up a new business manager.
Create a new ad account within the business manager.
Add a payment method to the account.
Complete the Initial Prevention Steps at the top of this article.
Proceed with advertising from the new account.
Restricted Personal Profile
This is where things get hairy, as a personal profile is needed to advertise. Your options are:
Request further reviews of your profile on Facebook.
Advertise from a co-worker's account.

